Hello!
I'm here today to show you how to paint stripes! As I mentioned yesterday.....this is no feat for the weak. There are several steps that are time consuming but trust me the end result is worth it. My friend Jess and I spent the majority of Saturday working on her bedroom but it was worth it.
I have to give credit because I followed
G&D's tutorial and it worked perfectly. Check out her blog if you haven't already. Her home is amazing...and her little girl is pretty darn cute too! :)
Here is the before. We were only painting every other stripe a darker gray.
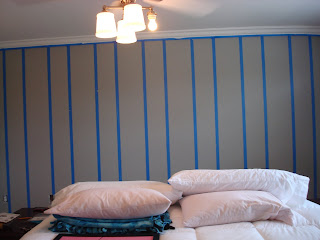
Step 1: Measure the wall and figure out how wide you want your stripes to be. We did 12" stripes, which meant 16 stripes for us. We put pencil tick marks every 12" along the bottom of the wall and then used a laser level to put a tick marks along the top.
 Step 2: We used a chalk line to snap a line onto the wall. Taping over the chalk didn't seem smart since we thought it would rub off so we used a large level to draw over the chalk line with a pencil. This was no fun x 10.
 Step 3: Next was the step I thought was going to be way worse than it was. It wasn't too painful to tape straight along the pencil marks although at this point we both were going cross eyed and really wanted a drink.
 Step 4: Paint the entire alternating stripe and the tape with Behr Faux Glaze to seal the tape down so that no paint will leak through. Trust me. After you have spent 4 hours measuring, chalk lining, drawing and taping these stripes you want to ensure when you peel off the tape it looks perfect. We painted the entire stripe so it would look even rather than just painting the tape.
 Step 5: When the glaze is dry (about 30-45 min) Paint! Since we were only painting every other stripe this wasn't too bad....plus our stripes were wide enough we could use a roller.

Step 6: Peel off the tape. I have to tell you that we both nearly had an anxiety attack at the thought of peeling off the tape and having it not look right. We definitely could have used a drink at this point. Once we finished painting we waited 20-25 min before we started peeling. PEEL OFF THE TAPE WHEN THE PAINT IS STILL WET. Very important.
Here is the final product with her room back together later that evening! Stay tuned for the rest of the transformation of this room!

Emily